Table of Contents:
- Introduction to DIY Horse Jump Planks
- Materials and Tools Needed
- Step-by-Step Construction Guide
- Safety Considerations
- Incorporating Jumps into Training
- Conclusion
Introduction to DIY Horse Jump Planks
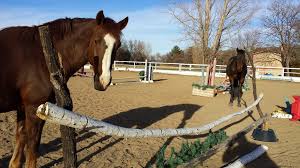
Constructing your own horse jump planks at home can be a fulfilling project for equestrians who want a training setup tailored to their needs. By making your own planks, you gain creative control over the designs, colors, and dimensions, resulting in a customized arena that suits both your horse’s requirements and your horse jump designs. Many riders look to specialty suppliers for inspiration and to ensure their home-built jumps meet current safety and performance standards; browsing professional resources can help spark innovative ideas while keeping your project safe and practical. This comprehensive guide will walk you through the process, from planning and sourcing materials to executing a safe build that will stand up to repeated use in all seasons.
Materials and Tools Needed
- Wooden Planks: Select pressure-treated lumber—you want this wood to withstand rain, sun, and all weather conditions without rotting or warping. Standard jump planks usually measure 2×6 or 2×8 inches in width and 10 to 12 feet long, providing a stable surface for your horse to jump over.
- Jump Standards: These vertical posts hold your planks at the desired height. You can make your own wooden standards for a fully custom look, or purchase pre-manufactured metal or wooden versions. Ensure they’re durable and suited to the weight and height of your intended setup.
- Paint and Brushes: Weatherproof, outdoor paint is essential—not just for style, but also for protecting wood from the elements. Select bright, contrasting colors to make the jumps easier for your horse to see, improving safety and confidence.
- Measuring Tape and Level: Straight lines and even heights are critical—use a tape measure to ensure accuracy and a level to keep all planks perfectly horizontal, promoting safe, balanced jumps.
- Drill and Screws: Always use exterior-grade screws and hardware for assembly. They resist rust and help ensure the jumps remain sturdy, even in wet or humid conditions.
- Saw: A circular saw speeds up the job and helps you make precise, clean cuts for your planks. A handsaw can also work, but with a bit more effort.
- Sandpaper or Power Sander: After cutting, it’s vital to sand the edges and surfaces of each plank to eliminate splinters, rough patches, or sharp corners.
Step-by-Step Construction Guide
Measure and Cut the Planks
- Start by deciding how long you want your jump planks to be. Recommended lengths are generally 10 to 12 feet, offering plenty of width for most arenas while remaining manageable for DIY builders. Use a measuring tape to mark the desired length on the wood, and then make clean cuts using your circular saw. Ensuring each plank is identical in length will allow for a uniform look and balanced jumps across your course.
Sand the Edges
- Once your planks are cut, use a power sander or coarse sandpaper to thoroughly smooth the cut edges, ends, and surfaces with knots or rough grain. Carefully sanding reduces the risk of your horse being scratched or injured and gives your planks a polished, professional finish that will make them easier to paint.
Paint the Planks
- Apply a high-quality wood primer first to help the paint adhere and last longer outdoors. After the primer dries, use at least two coats of weather-resistant paint, choosing colors that provide high visibility for your horse. Bold stripes, checkerboards, or simple geometric patterns are both functional and fun—browse professional horse jump designs for inspiration and ideas on personalizing your setup.
Prepare the Jump Standards
- If you’re building your own standards, construct each with a broad base to prevent tipping. Install adjustable jump cups at several heights, secured with strong pins or screws, to accommodate horses at different training levels. If opting for store-bought standards, check that they are free from sharp edges and move easily yet hold planks firmly in place during use.
Assemble the Jump
- After the paint has fully dried, gently set each plank in the jump cups at your chosen height. Use a level to guarantee that the plank is perfectly flat, and double-check the stability of the standards before inviting your horse to try the obstacle. Test the assembled jump for sturdiness by giving it a gentle shake and inspecting each connection, ensuring nothing shifts or wobbles under pressure.
Safety Considerations
- Stable Ground: Always set up level jumps, hard-packed, and well-drained ground. Avoid rocky or uneven sites, as stability is crucial for both jump standards and your horse’s safety. Soft or muddy ground can cause your standards to tip or shift if struck.
- Regular Inspections: Before every session, walk around your jumps to check for protruding screws, chipped wood, or signs of rot or general wear. Address these issues immediately by sanding, tightening, or replacing damaged components to reduce the risk of accidents for both horse and rider.
- Appropriate Heights: Begin with low plank heights, particularly for inexperienced riders or horses new to jumping. Building up the height too quickly can erode trust and lead to refusals, run-outs, or injuries. Consistent, gradual increases are key to developing confidence and technique.
Incorporating Jumps into Training
Introduce new jumps slowly so your horse can become comfortable. Start by walking or trotting calmly over a low plank, encouraging your horse to take its time and evaluate the obstacle. Encourage curiosity—let the horse sniff or look at the jumps to prevent spooking later. As horse and rider gain confidence, you can introduce more complex exercises like canter approaches, related distances, or small grids that require straight and rhythmic strides. Planks with broad, flat tops are excellent for working on a horse’s jumping style, boosting straightness and clean, confident takeoffs.
Conclusion
With the right approach and a focus on safety, building horse jump planks at home is a practical DIY project offering ongoing benefits for both riders and horses. Carefully selecting your materials, following best practices for construction, and keeping up with regular maintenance will result in jumping obstacles that boost your arena’s training possibilities while expressing your creativity. Explore a variety of horse jump designs as you plan—each jump you build is a step toward a more engaging, effective, and enjoyable training experience. With preparation and consistent care, your homemade jumps will encourage progress and enjoyment for years to come.


Leave a comment